
Before you begin
Messaging separates Announce, Scheduled, and Saved audio. Start by creating audio you can listen to and reuse, then set its schedule and destination zones.
This guide uses a last-orders reminder for the Café zone at The Corner House. Use your own wording, timing, and zone names. The video demonstrates audio preview and saved configuration; it does not broadcast to venue speakers.
You will need
- Access to Messaging and the locations and zones you want to use.
- The wording, language, days, time, and dates approved for your venue.
- An account that can generate announcement audio, with enough credits for the cost shown before Preview.
- A connected zone player for delivery when the scheduled time arrives.
Video tutorial
How to Create and Schedule an Announcement in Beat Breeze
Watch the walkthrough, or continue with the complete written steps below.
Write or choose the announcement
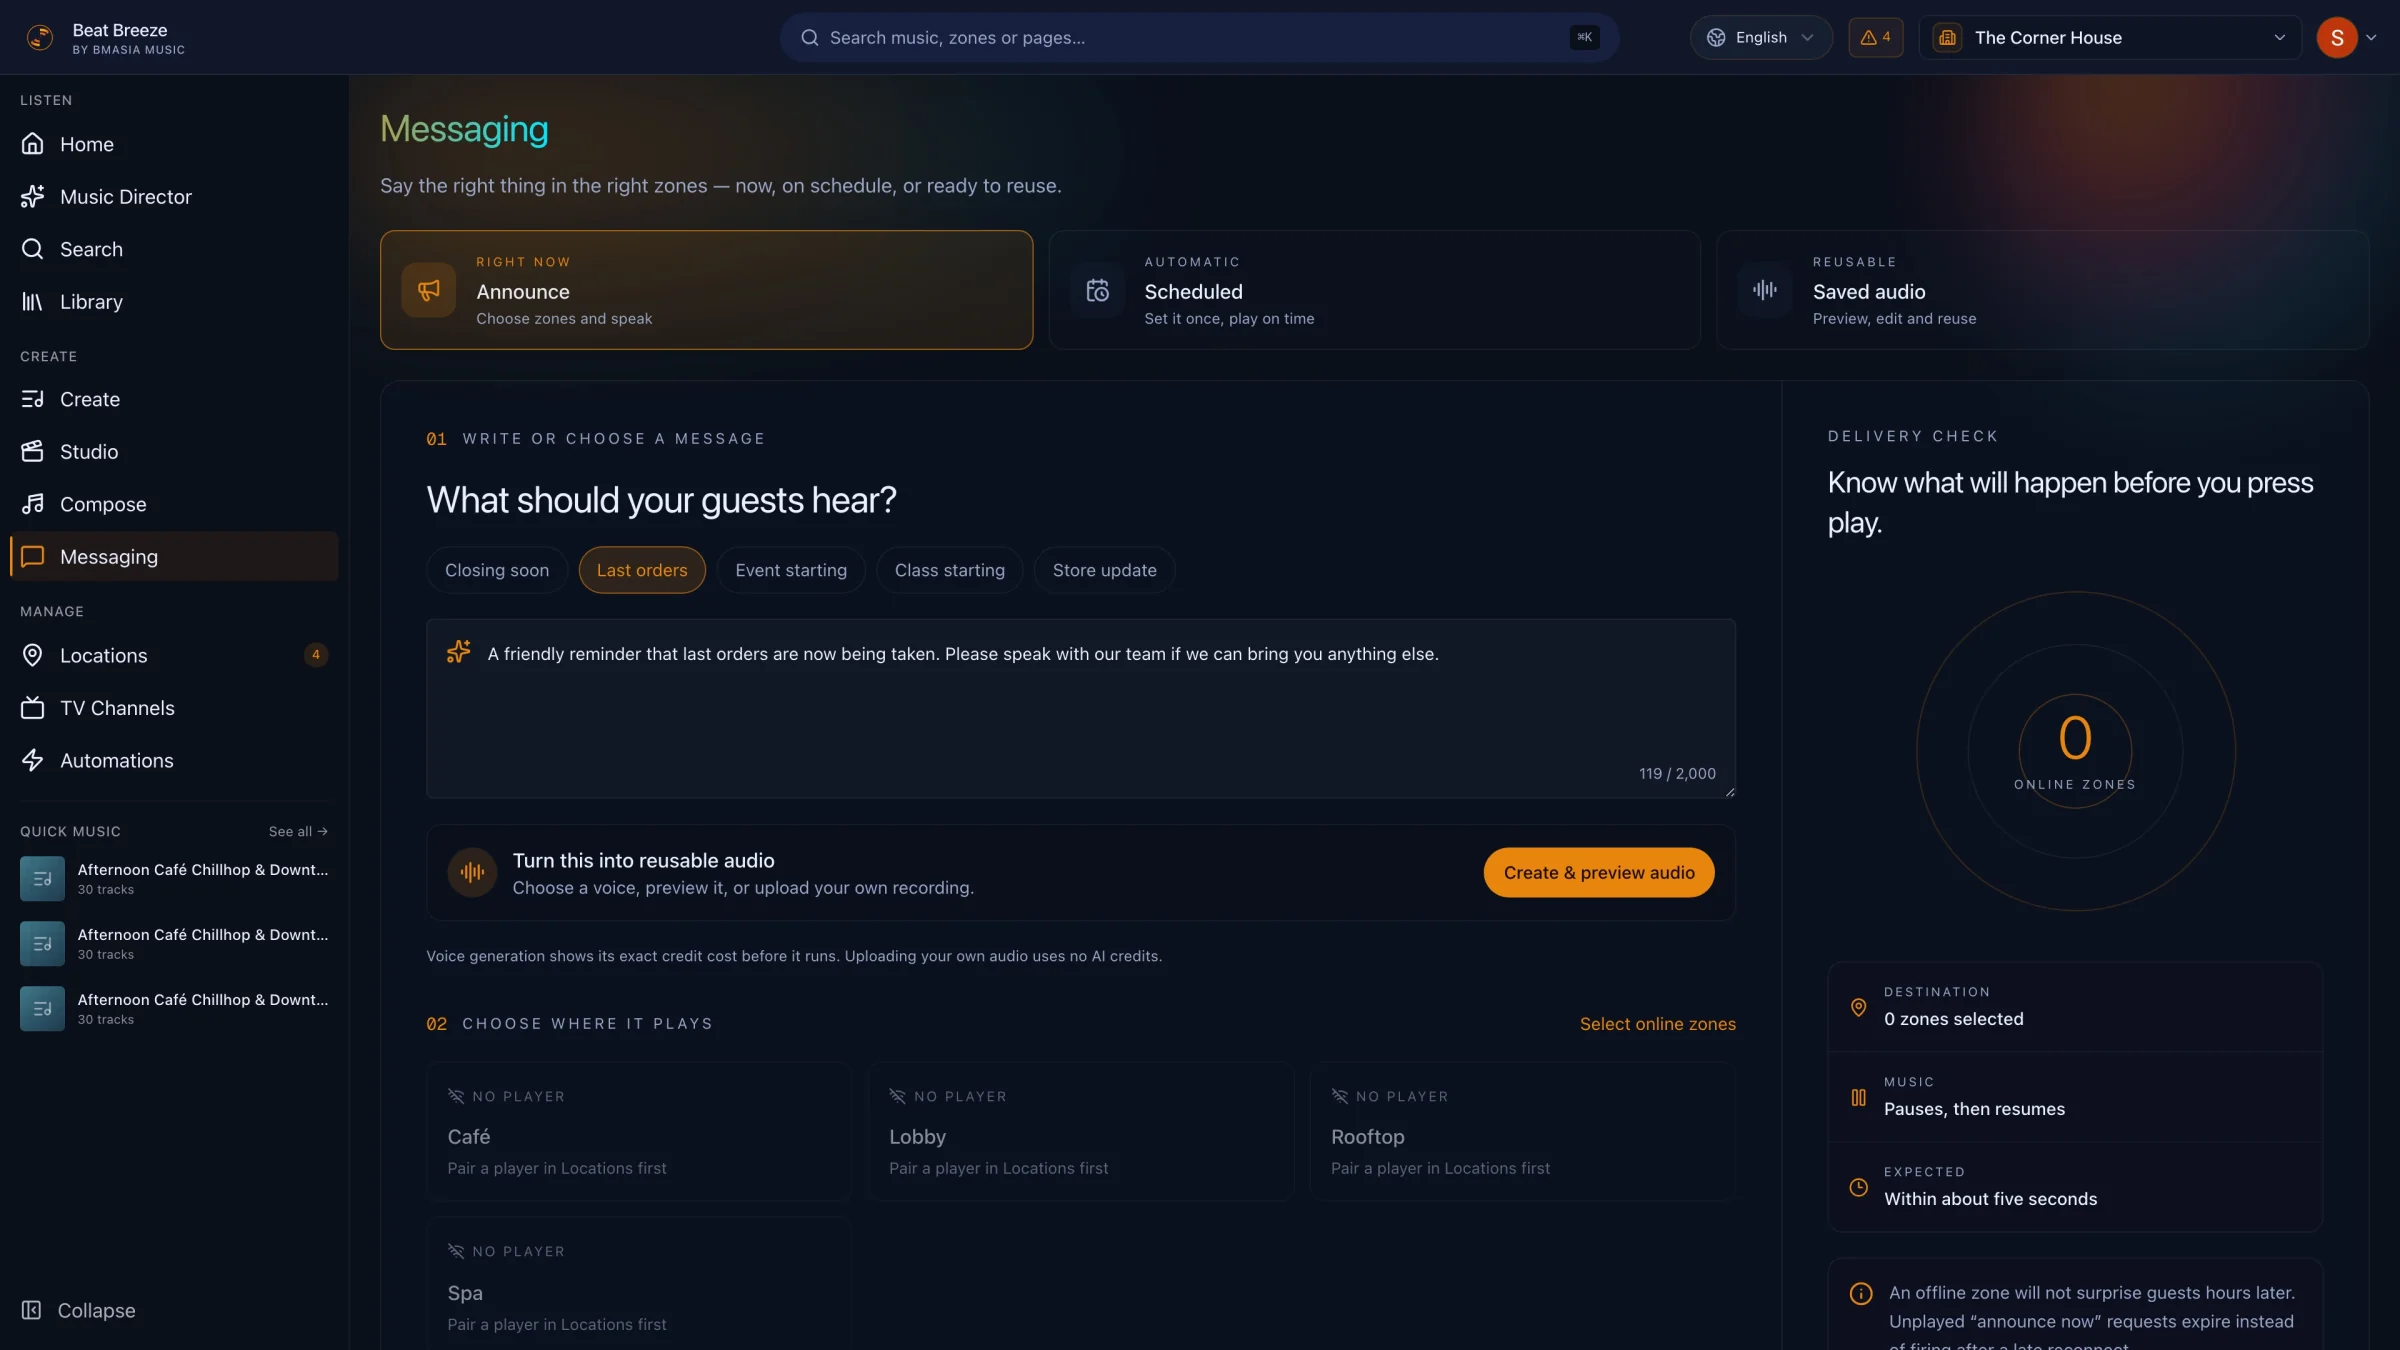
Open Messaging and stay on Announce. Choose Last orders to start from the template, or write your own message in Announcement text.
Read the wording before creating audio. Make any changes needed for your venue, such as when the kitchen closes or how guests should place their last order.
Choose the voice, preview, and save the audio
Choose Create & preview audio. Give the message a recognizable name, such as Last orders, and keep Text to speech selected.
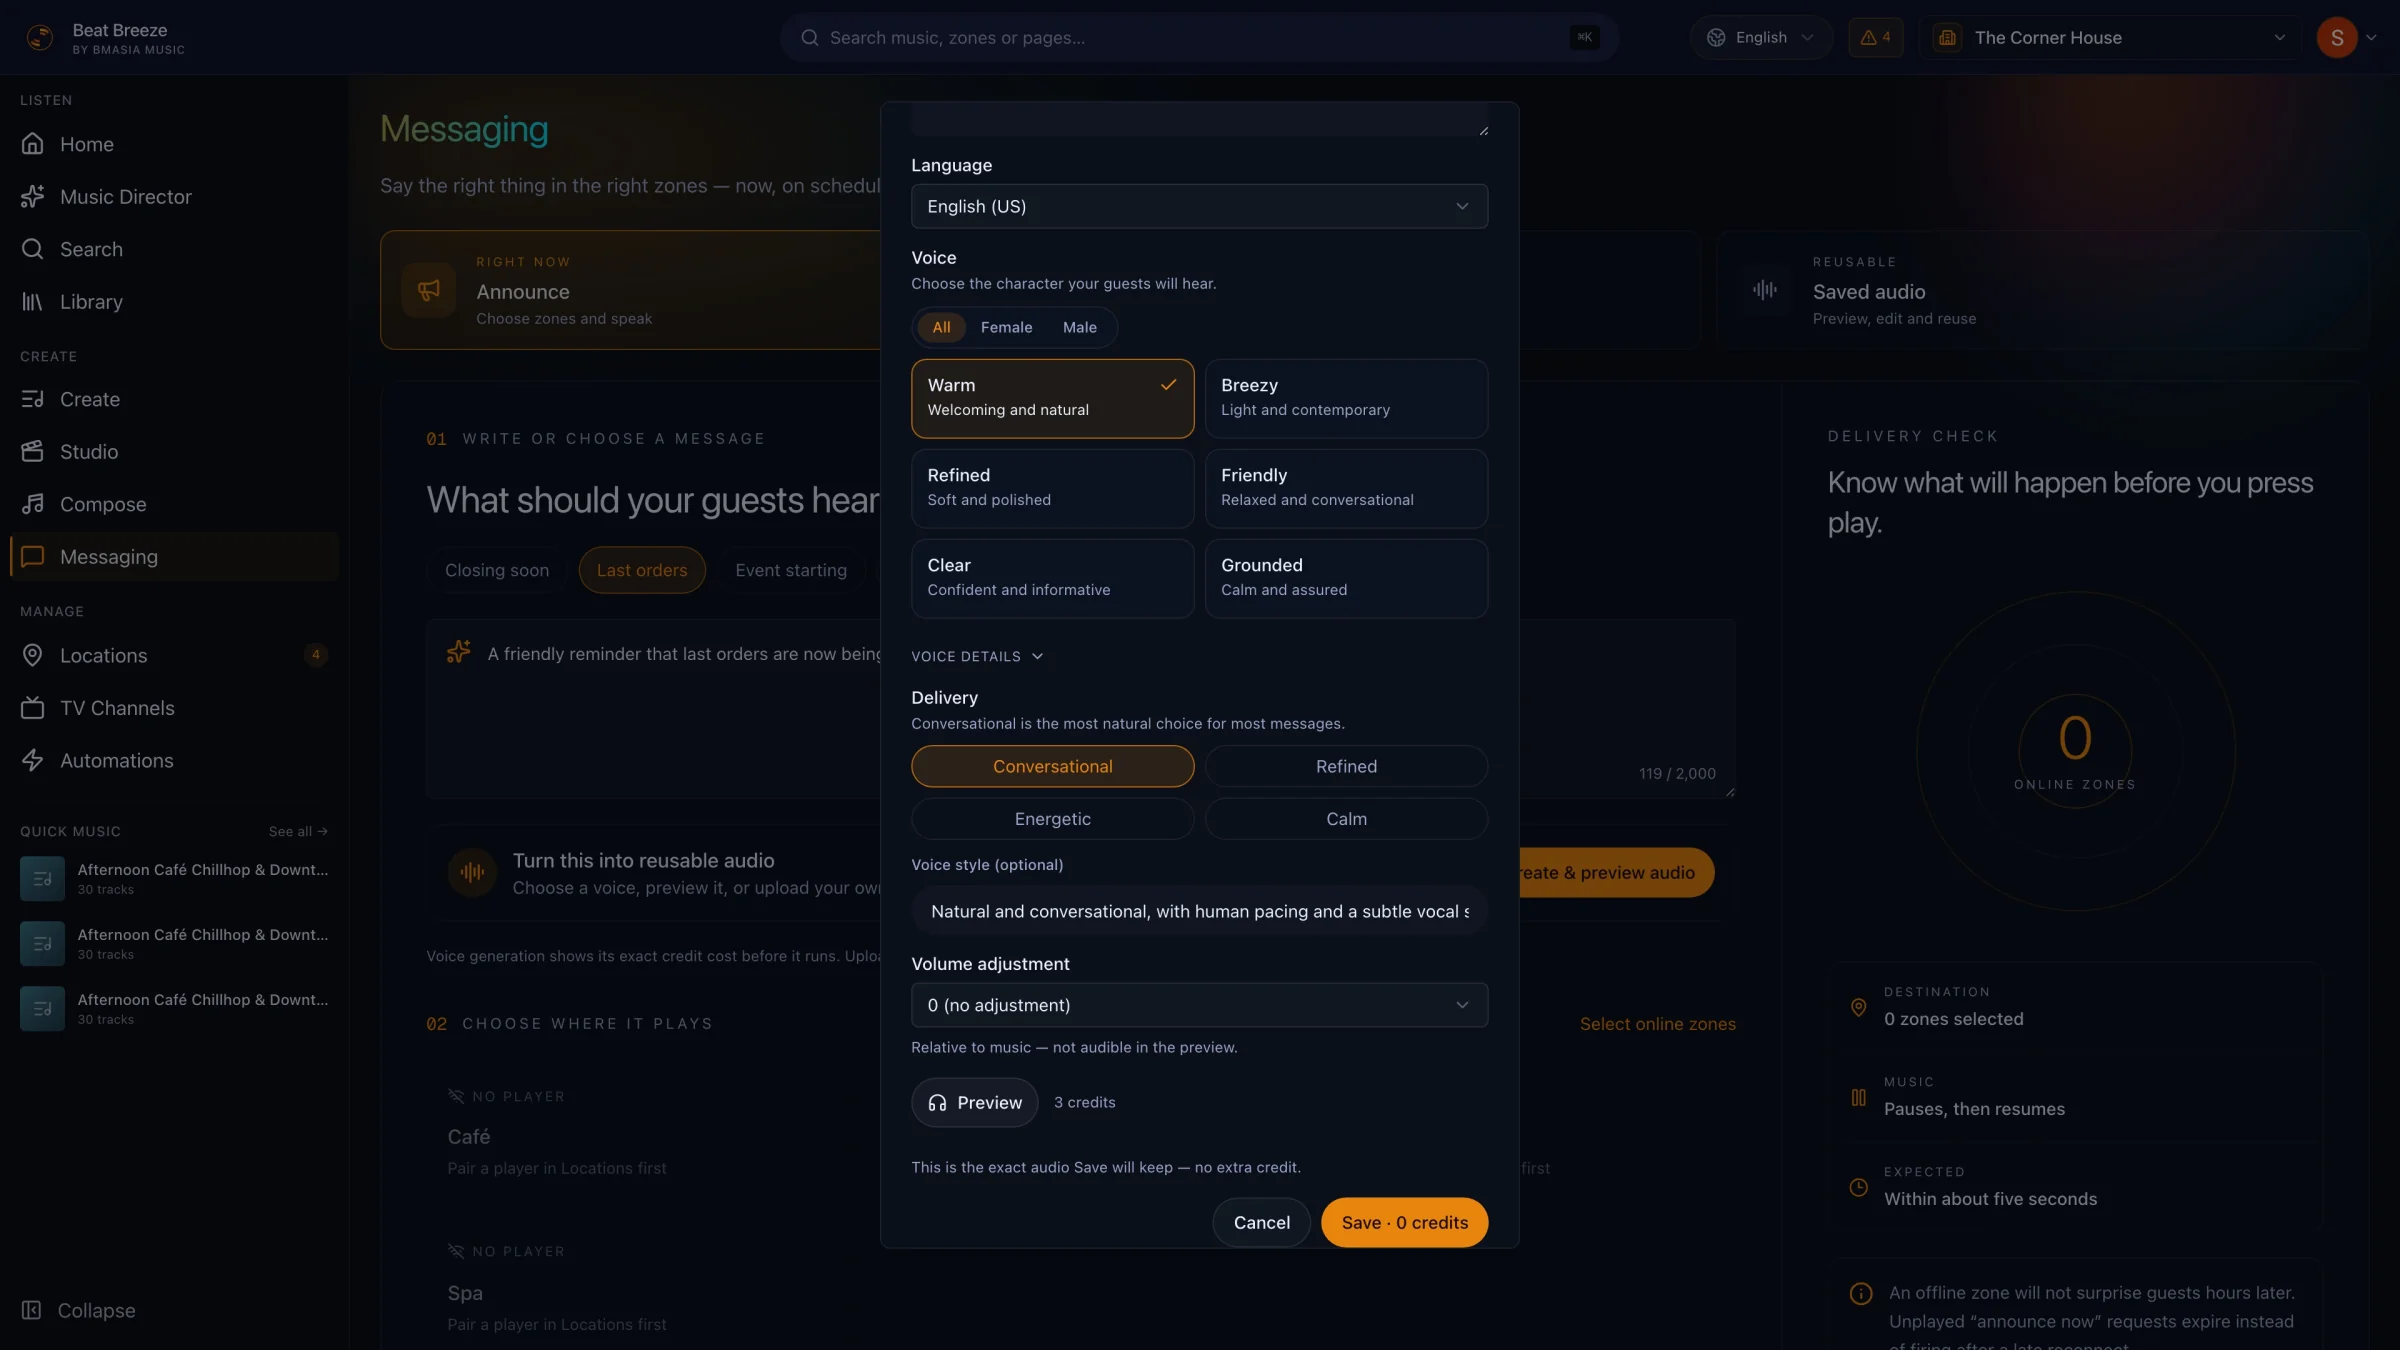
Choose the Language, voice, and Delivery that suit the message. The example uses English (US), Warm, and Conversational.
Check the credit cost beside Preview, then choose Preview and listen to the complete announcement. When the words and voice are right, choose Save. With the preview settings unchanged, Save keeps that audio without a second generation charge.
Create an announcement schedule
Open Scheduled and choose Schedule an announcement. Enter a Name that explains its purpose, such as Café last orders.
Choose Add messages to set the days, timing, and saved audio for this schedule.
Set the days, time, and message
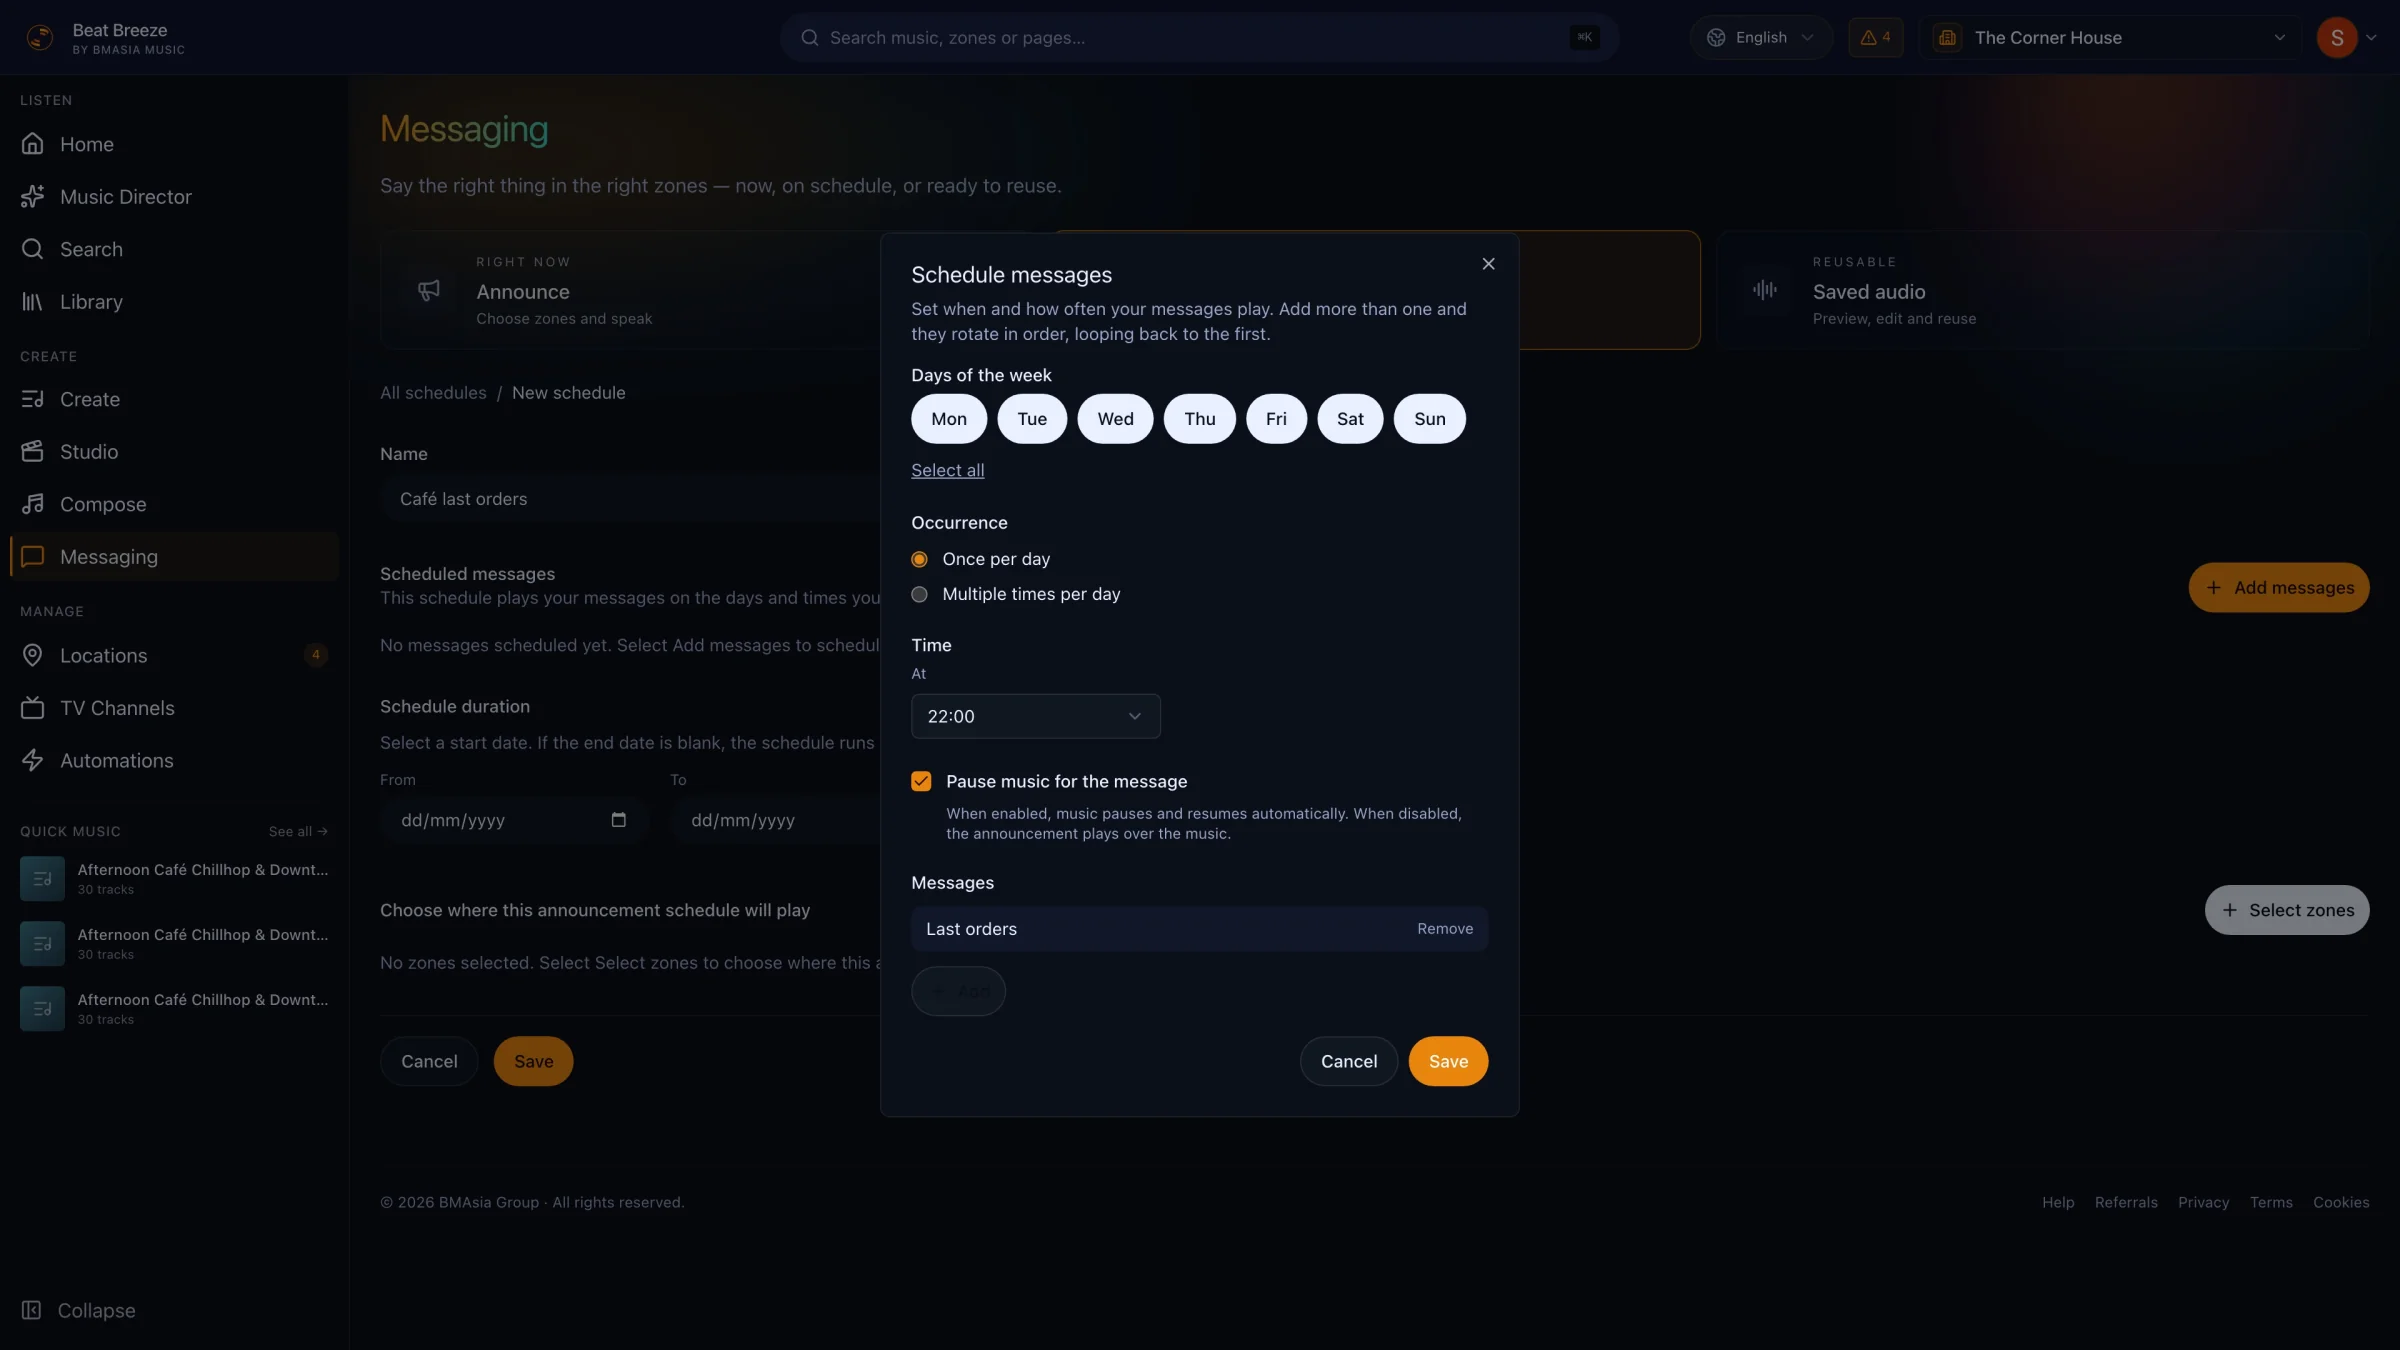
Select the days the announcement should run. Select all chooses every day. For one daily reminder, keep Once per day selected and set the time; the example uses 22:00, or 10 p.m.
Keep Pause music for the message selected if you want the player to pause the music for the announcement and resume it afterward.
Under Messages, choose Add and select the saved Last orders audio. Choose Save in the dialog to return to the schedule form.
Choose the date range and zones
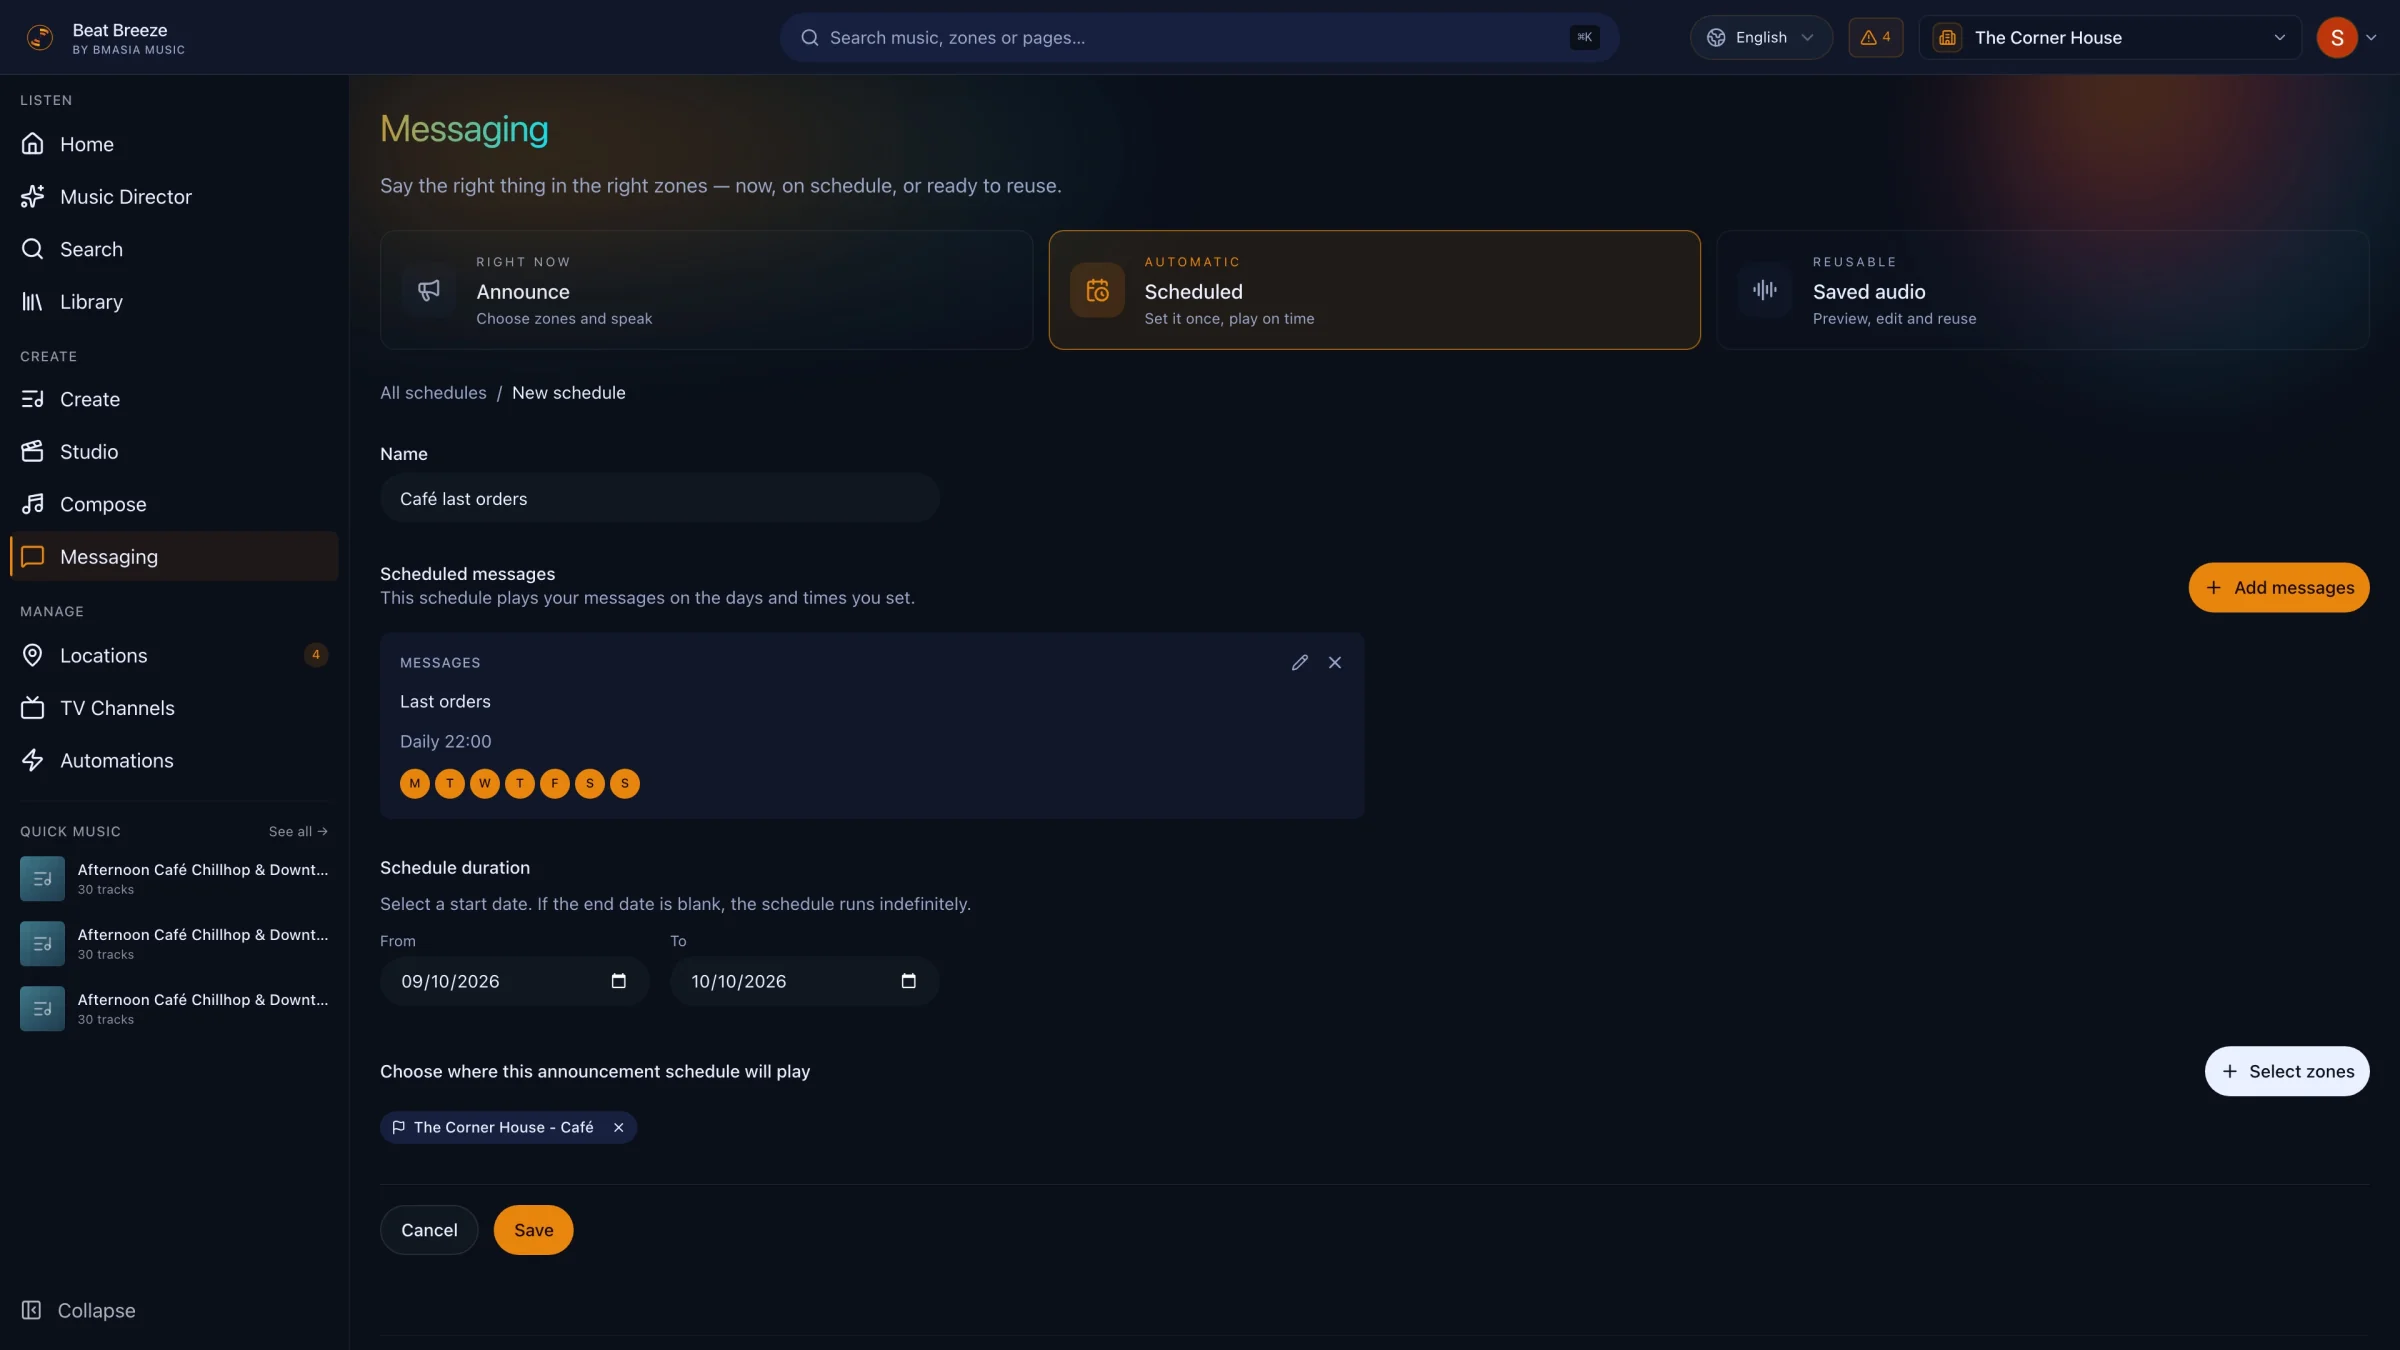
Set the From date. If the schedule is temporary, add a To date so it ends automatically. Leaving To blank keeps the schedule running without an end date.
Choose Select zones, select the zones that should receive this announcement, and choose Done. The example targets Café only; select several zones when the same message should reach them all.
Review and save the schedule
Check the message, days, time, From and To dates, and selected zones. Choose Save on the schedule form.
The Scheduled page now shows the saved entry with its status, dates, and timing. Confirm that these match your intended schedule.
Return to Edit when plans change
Open the schedule's options menu and choose Edit. Adjust the message, days, time, dates, or zones, then save your changes.
Use a To date for an announcement that should run only for a limited period. The current schedule menu has no separate disable switch.
Confirm it worked
What success looks like
- The complete announcement has been previewed and saved as reusable audio.
- The saved schedule shows the intended message, days, time, dates, and zones.
- The team knows where to edit the schedule and has arranged its first delivery check at the venue.
Troubleshooting
Save shows a generation cost after I previewed the audio
Check whether the text or voice settings changed after Preview. Preview the revised version and review the displayed cost before saving. An unchanged preview can be saved without another generation charge.
Last orders is missing from the message picker
Confirm that you saved the audio, rather than only previewing it, and that you are in the same Beat Breeze workspace. Check Saved audio, then return to Scheduled and add the saved message.
The zone shows No player
Pair a Player with that zone through Locations and keep it connected. Saving an announcement schedule does not connect a venue device or confirm that its speakers are ready.
The schedule is saved, but the announcement was not heard
Recheck the saved days, time, date range, message, and destination zones. Ask on-site staff to confirm the player connection, audio output, and volume. If the saved dates differ from those you entered, reopen Edit and contact support before relying on the schedule.
Tell us what is happening in your venue
Include the location, zone, player type, and the last step you completed. That gives our support team a useful starting point.
Contact Beat Breeze support